Last week we looked at the setup of a class component. Today we’ll look at some of the regular things that go in it and how they’re set up.
In Part I we had the simplest possible class component:

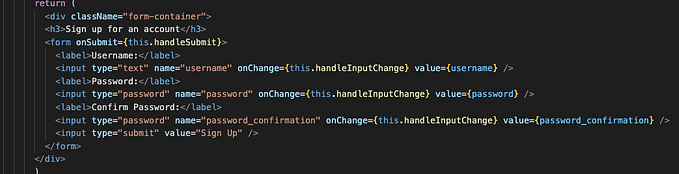
And we also had an example of an equally useless component, but with more elements:

These posts aren’t tutorials, but rather code examples so you can quickly reference how things are set up. If you’re looking to learn React.js, start with the React docs.
Class constructor
The first bit inside the component is the class constructor.

Actually, you don’t need this anymore, even though this is the pattern outlined and recommended in the React docs. All of the above can be reduced to this:

That’s it! Yes, really. And if you want those values to come from props, you can stick that right in there, too. This does not replicate the behavior of those .bind statements, but using arrow functions does. You’ll notice that in our expanded example, we had one arrow and one non-arrow function; if we just use arrow functions, they inherit “this” just fine, and we can do away with our constructor entirely. Actually, they weren’t using “this” in the first place, but better to be prepared. Our new component:

Fetch
Our second event handler has the syntax for a fetch request. Let’s take a look at example fetches for different HTTP methods.
  fetch(‘http://api.thisisfake.org/dataofsomesort.json')
    .then(r => r.json())
    .then(data => {
      this.setState({
        somethingWeCareAbout: data.somethingInData
      })
    })
The above is a standard GET. It’s treated as the default, so you don’t even need to specify. Of course you don’t need to setState with a fetch, but it’s pretty likely to be what you want.
fetch(`http://localhost:3000/comments`, {
  method: "POST",
  headers: {
    "Content-Type": "application/json"
  },
  credentials: "include",
  body: JSON.stringify(this.state)
})
  .then(r => r.json())
  .then(updatedPost => {
    this.setState({
      body: ""
    })
this.props.displayComment(updatedPost.comments[updatedPost.comments.length - 1])
  }
The above is a real POST from an application I wrote. Since it’s not a GET, you have to specify what it is with “method”, and since we’re sending data (POST and PUT) we include a Content-Type header to let the server know what we’re sending it. Because I’ve got an authorization setup, we have a a “credentials” mode. A full documentation of everything that can go into a fetch request is available here.
In “body” we can see that we have to convert our state to JSON before we send it.
That’s the end of the fetch. After that we can see that I blanked state (when you submit a comment, the comment field should go blank) and then called a method that seems to optimistically render what I just POSTed.
handleDelete = event => {
  event.preventDefault()
  fetch(`http://localhost:3000/posts/${this.props.post.id}`, {
    method: "DELETE"
  })
  .then(r => r.json())
  .then(console.log("Deleting"))
}
Here’s a delete from the same app. Note that we interpolated the ID.
In Part III we’ll cover lifecycle methods.